Wedding Timeline Printable
One-Minute Summary
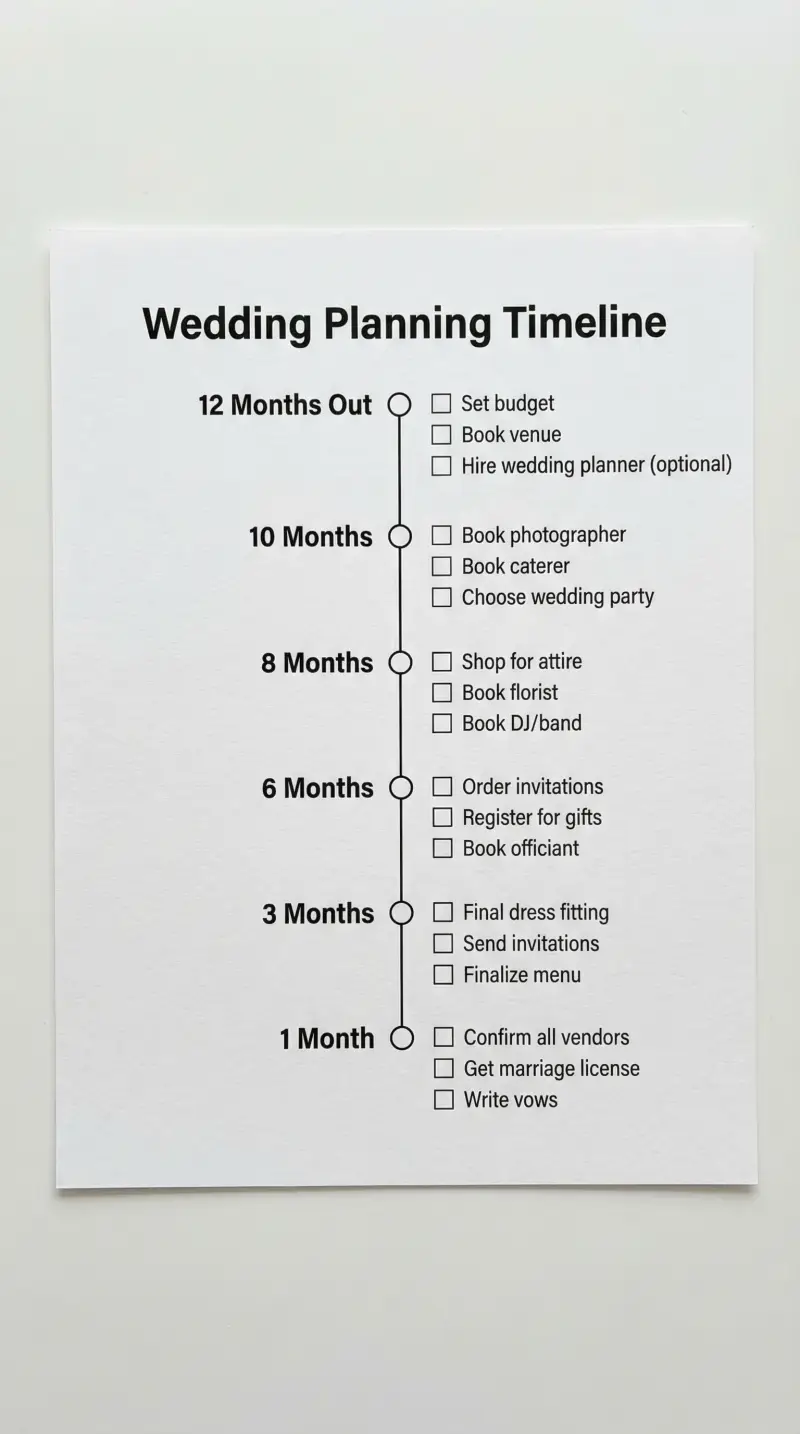
This wedding timeline printable maps your planning into a clear 12-month arc—from engagement to the big day. Each milestone section shows when to book the venue, send invitations, finalize catering, and handle last-minute details. Print on U.S. Letter paper and post it where you'll see it. Many couples use it alongside their checklist to stay on track without missing critical deadlines.
Preview & Download
Print Settings
- Paper: U.S. Letter (8.5" × 11")
- Orientation: portrait
- Scale: 100%
- Margins: Default (0.5")
What’s on this wedding timeline
This wedding timeline printable gives you a 12-month planning arc—from engagement to the big day. Each section shows major milestones and when they typically fall. Here’s how to use it.
The layout flows vertically: 12 months at the top, day-of at the bottom. You work through it by writing real dates next to each milestone and using the notes column to track vendors and status.
How to use this timeline — 3 real scenarios
Scenario 1: Newly engaged couple mapping a 12-month plan
You just got engaged and have a year until the wedding. Print the timeline and sit down together to map milestones to real dates. Venue by month 10, photographer by month 9, invitations out by week 8. Seeing it on one page makes the scope manageable—you’re not guessing what comes next. Post it on the fridge and refer to it weekly. By month 6, you’re ahead of schedule because you knew exactly when to act.
Scenario 2: Couple with a 6-month compressed timeline
Your wedding is in 6 months. Use the same printable but collapse the 12- and 9-month sections. Focus on months 6, 3, and 1. Double up on vendor bookings—venue and caterer in the same week. Mark what’s urgent versus what can wait in the notes column. The timeline still gives structure; you’re just moving faster. Many couples find that seeing the full arc helps them prioritize—they know what to skip and what to keep.
Scenario 3: Couple coordinating with parents and wedding party
You’re sharing planning duties. The timeline becomes your shared reference—everyone sees when tasks are due. Assign names in the notes: “Dad—rehearsal dinner venue by month 4.” When someone asks “when do we need flowers?”, you point to the sheet. The visual timeline reduces back-and-forth and keeps everyone aligned.
Example fill-out
12 months out: Venue booked—Oak Grove Estate, deposit paid 2/1. Preliminary guest list—target 120, finalize by month 9. Budget allocated—50% venue/catering, 30% photos/vendors, 20% extras.
9 months out: Photographer—Johnson Photo, contract signed 3/15. Caterer—tasting 3/20, menu due 4/1. Florist—Bloom & Co, mood board sent, quote pending.
6 months out: Invitations ordered—Minted, proof due 4/15, mail by 5/15. Attire ordered—bride dress in, alterations 6/1; groom tux reserved.
3 months out: RSVP deadline 4/15, final head count to caterer by 4/22. Day-of timeline draft shared with vendors by 4/30.
Common mistakes (and how to fix them)
-
Treating the timeline as decorative. Write real dates—not “8 weeks out” but “March 15.” Post it where you’ll see it. Check it weekly.
-
Booking the venue last. Venue and date drive everything. Lock those first, then build the rest around them.
-
Forgetting buffer time. Invitations need 8 weeks—but design, proof, and printing take 3–4 weeks. Add those steps or you’ll miss the deadline.
-
Not sharing with key people. If parents or your wedding party help, give them a copy. Shared visibility means fewer surprises.
-
Ignoring vendor lead times. Popular photographers and venues book 9–12 months out. Your timeline should reflect that.
Customization tips
Shorter timelines: Collapse the 12- and 9-month sections and focus on 6, 3, 1, and day-of. The structure still works.
Destination weddings: Add rows for travel, legal requirements, and shipping deadlines. The timeline accommodates extra milestones.
Digital sharing: Scan or photograph and share with your partner and family. Or recreate in Google Sheets with conditional formatting for overdue items.
Printing Tips
- Print on U.S. Letter (8.5" × 11") in portrait orientation
- Scale: 100% (do not use "Fit to Page")
- Margins: Default (0.5")
Next step in your wedding workflow:
Related Templates You Might Need
Most people use 2–3 of these together:
- •
- •
Helpful Guides
- •
Frequently Asked Questions
How is the wedding timeline different from the wedding checklist?
The timeline shows when major milestones happen—venue by month 10, invites by week 8. The checklist breaks each milestone into specific tasks. Use both: the timeline for the big picture, the checklist for the to-dos. Many couples pin them side by side.
What if my wedding is less than 12 months away?
Use the same printable but collapse the early sections. Focus on months 6, 3, 1, and day-of. The structure still applies—you're just compressing the front end. Prioritize venue, catering, and photography first.
Should I include the rehearsal dinner on the timeline?
Yes. Add a row for rehearsal dinner venue, head count, and menu—typically due around the 3-month mark. It's easy to forget when you're focused on the main event.
How do I know when to send invitations?
A common approach is 8 weeks before the wedding, with an RSVP deadline 3–4 weeks before. But invitations need design, proof, and printing—add 3–4 weeks for that. So 'order invitations' lands around 12 weeks out on your timeline.
How do I adjust the timeline if the wedding is in a different city or state?
Add milestones for travel bookings (month 10), local vendor scouting (month 8), and shipping favors or decor (month 3). Legal requirements vary by location — research marriage license rules for that state early in the process.
What paper size should I use?
U.S. Letter (8.5" × 11") portrait. Print and post it—fridge, desk, planning binder. Visibility is key; out of sight means out of mind.