Wedding Checklist Printable
One-Minute Summary
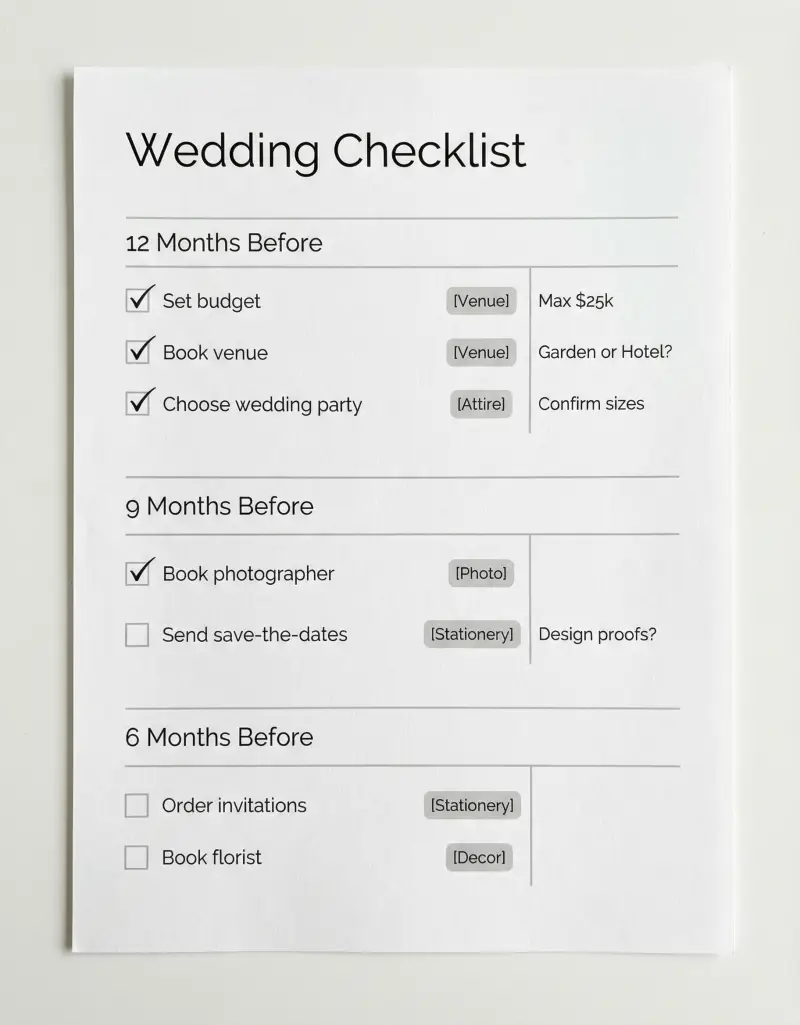
This comprehensive wedding checklist printable organizes your planning into timeline sections—from 12 months out to the wedding day. Each task has a checkbox, category tag, notes/vendor column, and optional budget flag. Print on U.S. Letter paper, pin it to your planning binder, and check off items as you go. Designed for couples who want one central place to track everything without missing critical deadlines.
Preview & Download
Print Settings
- Paper: U.S. Letter (8.5" × 11")
- Orientation: portrait
- Scale: 100%
- Margins: Default (0.5")
- 💡 Print portrait. Use a 3-hole punch for your planning binder. Laminate the day-of section for repeated reference.
What’s on this wedding checklist
This checklist is designed for couples who want structure without overwhelm. Every section follows the same pattern: timeline, task, category, checkbox, notes. Here’s what each part does and why it matters.
The layout uses portrait orientation so the timeline sections can flow vertically—12 months at the top, day-of at the bottom. You work through it in order, checking off items as you go.
How to use this checklist — 3 real scenarios
The checklist works for different planning styles and timelines. Here are three ways couples use it in practice.
Scenario 1: Newly engaged couple with a 12-month timeline
You just got engaged and have a full year until the big day. Print the checklist, grab a pen, and sit down together one evening. Start with the 12-month section: set your budget, draft a guest list, choose a date range, and begin venue research. Use the notes column to write down venue names, tour dates, and pricing. By month 9, you’re in the 6-month section—booking photographer, caterer, florist. The timeline keeps you from forgetting that invitations need to go out 8 weeks before the wedding. Each section feels manageable because you’re only focused on what’s due in that window.
Scenario 2: Couple with a 6-month compressed timeline
You’re getting married in 6 months. Use the 6-month variant—condensed sections that fit your shorter runway. You’ll double up on tasks (book venue and caterer in the same week, research photographers and florists in parallel). The notes column becomes critical: mark “urgent” next to venue and date, and “can wait” next to favors and signage. The checklist prevents overwhelm by showing you exactly what to prioritize. You might not do everything—some DIY projects get cut—but you won’t miss the non-negotiables.
Scenario 3: Couple managing remote or destination logistics
Your wedding is in another state or country. The checklist helps you separate local tasks from home-base coordination. Add rows for “ship favors by March 1,” “confirm marriage license requirements,” “book accommodations block for guests.” Use the vendor column to note who’s local (florist, officiant) vs. who you’re coordinating with remotely (invitations, your dress alterations). The timeline keeps travel logistics visible alongside traditional planning—so “send save-the-dates” appears before “book flights” in the right order. Destination weddings have more moving parts; the checklist makes them manageable.
Example fill-out
Here’s what a realistic section looks like when it’s actually in use:
12 months out:
- ☐ Set budget and allocate by category — Notes: 50% venue/catering, 30% photos/video/flowers, 20% attire and extras
- ☐ Create preliminary guest list — Notes: Target 120, need to trim 15 by month 9
- ☐ Book venue and hold date — Notes: Oak Grove Estate, deposit $2,500 paid 2/1, contract signed
9 months out:
- ☐ Book photographer and videographer — Notes: Johnson Photo — contract signed, $1,200 deposit, shot list due 2 weeks before
- ☐ Choose caterer, schedule tasting — Notes: Tasting 3/20, need 3 vegetarian entrees, final head count by 4/15
6 months out:
- ☐ Order invitations — Notes: Minted — design selected, proof due 4/15, ship by 5/1
- ☐ Book florist — Notes: Bloom & Co — mood board sent 3/10, waiting on quote, follow up 3/17
The notes capture who you’re working with, what’s paid, and what’s next. That’s the difference between a decorative checklist and one you actually use.
Common mistakes (and how to fix them)
-
Starting with the fun stuff before locking venue and date. Dress shopping and cake tastings are exciting—but venue and date drive everything. Book those first. Then photographer, caterer, and the rest have real deadlines. Don’t fall for the trap of planning the perfect centerpiece before you know where the wedding is.
-
Writing tasks that are too vague. “Plan music” goes nowhere. Break it down: “Book DJ or band,” “Create must-play and do-not-play lists,” “Confirm setup time and power requirements.” Specific tasks get done; vague ones get procrastinated forever.
-
Forgetting buffer time. Invitations need to go out 8 weeks before—but design, proof, and printing take 3–4 weeks. Add those steps to the checklist. Otherwise you’ll hit the 8-week mark and realize you’re two weeks behind.
-
Not using the notes column for vendor follow-ups. You’ll forget who you’re waiting on. Write “emailed 3/10, follow up 3/17” and actually set a reminder. The notes column is your short-term memory for 15 different vendors.
-
Trying to do everything yourself. Delegate. Use the checklist to assign who owns what—you handle catering, your partner handles music, your mom handles favors. Shared visibility means nothing falls through the cracks.
Customization tips
Google Docs version: Open the template, click File → Make a copy. Add rows for your specific vendors, cultural traditions, or DIY projects. Add an “assigned to” column (you, partner, parents). Use conditional formatting to highlight overdue items. Share the doc with your partner so you’re both editing the same list in real time.
Printing and binding: Print on standard U.S. Letter (8.5” × 11”) portrait. Use a 3-hole punch and add it to your planning binder. Keep it somewhere visible—fridge, desk—so you’re reminded to check off the next task. For the day-of section, consider laminating so you can re-check items during rehearsal if needed.
Adding tasks: Every wedding is different. Add rows for destination-specific tasks (legal docs, travel), cultural traditions (ketubah, tea ceremony), or elaborate DIY (handmade favors, signage). The template is a starting point; make it yours.
Printing Tips
- Print on U.S. Letter (8.5" × 11") in portrait orientation
- Scale: 100% (do not use "Fit to Page")
- Margins: Default (0.5")
- 💡 Print portrait. Use a 3-hole punch for your planning binder. Laminate the day-of section for repeated reference.
Available Variants
We've created specialized versions for specific needs:
- →12-Month Wedding Checklist — Full timeline from 12 months out to wedding day—ideal for engagements with a year or more to plan
- →6-Month Wedding Checklist — Compressed timeline for couples planning in 6–9 months; tasks grouped into shorter windows
- →Destination Wedding Checklist — Adds tasks for travel, legal requirements, shipping, and remote vendor coordination
Next step in your wedding workflow:
Related Templates You Might Need
Most people use 2–3 of these together:
- •
- •
- •
Helpful Guides
- •
Frequently Asked Questions
How many tasks are typically on a wedding checklist?
A full 12-month wedding checklist usually has 80–120 tasks depending on detail level. We've condensed the essentials into about 90 items. You can add more for DIY projects, cultural traditions, or destination-specific logistics.
Should I start with the 12-month or 6-month version?
If you have 12+ months, use the 12-month version—it spreads tasks reasonably and prevents last-minute rushes. If you have 6–9 months, use the 6-month variant. Under 6 months, consider the compressed timeline or a custom list with only high-priority items.
Can I use this for a destination wedding?
Yes. Use the destination variant or add your own rows for travel logistics, legal requirements (marriage license, documents), shipping favors, and coordinating with local vendors. The structure works—you just layer in destination-specific tasks.
What if my wedding is in less than 6 months?
Use the 6-month compressed checklist and prioritize: venue, catering, photography, and attire first. Many other items can be condensed or delegated. The checklist still helps you see what's left and avoid forgetting critical tasks.
How do I track budget on the checklist?
Use the budget flag column to mark tasks that involve payments. You can also add a small 'est. $' note next to each—seeing totals helps you stay within your budget. For detailed tracking, pair this with our Wedding Budget printable.
Can my partner and I both use the same checklist?
If you print it, use one shared copy in a visible place (fridge, planning binder) and divvy up tasks—mark who owns what in the notes column. For digital collaboration, use the Google Docs version and share it—you can both edit and comment in real time.
What paper should I use?
Standard U.S. Letter (8.5" × 11") copy paper works fine. Portrait orientation fits the timeline layout. For the day-of section, consider printing on cardstock or laminating—you'll reference it repeatedly and may get a little sweaty.